
Database Information: Embase via Ovid
Embase via Ovid (1974-present) is a database that indexes over 7,500 peer reviewed journals from over 90 countries. It covers all aspects of biomedical and pharmacological research. It is updated weekly. Embase Classic (1947-1973) is a backfile drawn from the Excerpta Medica Index that covers over 3,000 biomedical and pharmacological journals.
Searching Embase via Ovid
Searching Ovid Embase
Ovid Embase defaults to the Advanced Search tab. Make sure that the Map Term to Subject Heading is checked so that you will be mapped to the controlled vocabulary terms found in Emtree, the Embase counterpart to Medical Subject Headings (MeSH) in Medline. The most effective way to conduct a search in Embase is to formulate your search statement in a sentence form as brief as possible and then search the basic components of your search one term at a time. For example, say you wanted to find articles that address the question of whether exercise can help control type 2 diabetes in obese patients. Begin by typing in ‘type 2 diabetes’ and clicking on the Search tab.

Subject Headings
This will take you to the subject heading results, where Ovid Embase will map you on to the Emtree term that corresponds to the term that you typed in. In using the controlled vocabulary in Medline or Embase you are searching for the concept corresponding to the term you typed in regardless of what word the author used. In this case the Emtree term occurs in blue print above the term that you typed in. In this case the Emtree term for ‘type 2 diabetes’ is non insulin dependent diabetes mellitus. If you choose to search the keyword ‘type 2 diabetes’ instead of the Emtree term you were mapped to, Ovid will only retrieve articles where the term ‘type 2 diabetes’ occurs in the title, abstract, or descriptors of the article.

Auto Explode, Focus, and Scope
Make sure that Auto Explode box is checked so that your search includes any narrower terms that fall under the term that you searched. If you choose to restrict to Focus, you will only retrieve those articles where the term that you searched is considered to be a major focus of the article. Finally, Scope will provide a list of synonyms for the term that you are searching. If you have chosen to search the Emtree term, clicking on Continue will take you to a list of subheadings:

Subheadings
Subheadings allow you to narrow your search results by concentrating on a specific aspect of the term that you are searching. In this case the subheading Prevention was chosen because the search concerns whether exercise can help prevent type 2 diabetes in obese patients. Clicking on Continue will complete the first part of your search.

Here we retrieved 5581 articles on the prevention of no- insulin dependent diabetes. We are now ready to enter our next two search terms: ‘obesity’ and ‘exercise’. Once we have searched all three terms, we can combine them together using the And button below the search history box.

You can further refine your search by limits. Here the search has been limited to Human and English Language.

Types of limits vary by database. While the limits in Ovid Medline and Ovid Embase largely overlap, there are limits in Medline that are not in Embase and limits in Embase that are not in Medline. For example there are limits to Review Articles, Pharmacological Actions, Structured Abstracts, and Core Clinical Journals in Ovid Medline that are not in Embase and a limit to Cochrane Library in Embase that is not found in Medline.
Click on Additional Limits to choose from a wider range of limits.

Reviewing Citations
Once you have completed you can either click Display to the right of the chosen set or you can scroll down if the set you wish to review is the last set displayed. Mark individual citations by clicking on the box on the upper left hand corner of each citation. To access the fulltext of an article, if available, click on the Find It link.

To view more detailed information about a citation, click Complete Reference. Here you will find complete citation information, including the abstract (if available) as well as a list of subject headings assigned to describe the article. These subject headings can be used to refine your search strategy.
Getting full text
When using Library resources, the FindIt link is your connection to accessing the full text of articles if a PDF link is not already visible.

This short video will show you how to get to the articles you need for your research paper or other University of Minnesota assignments. Never pay for articles! If we don't have it online, request it and we will get it for you.
Exporting Results From Embase
Managing Results
To print, email, or export citations to your preferred citation manager or another file type, select individual citations by checking the checkbox next to each numbered citation or check Select All. Then click the Print, Email, or Export link.

Saving Results/Personal Account in Embase
Saving Your Search
- To save a search in Ovid Embase, you must first create a Personal Account
Creating a Personal Account
To save your search history and/or to set up automatic email alerts in Ovid Embase, you need to set up a personal account in Ovid. Click My Account in the upper right corner of the main search page.

On the next screen click Create a new Personal Account and complete the form to register for an account. You will be prompted to create a Personal Account Name and Password. Passwords must be 6-8 characters in length.
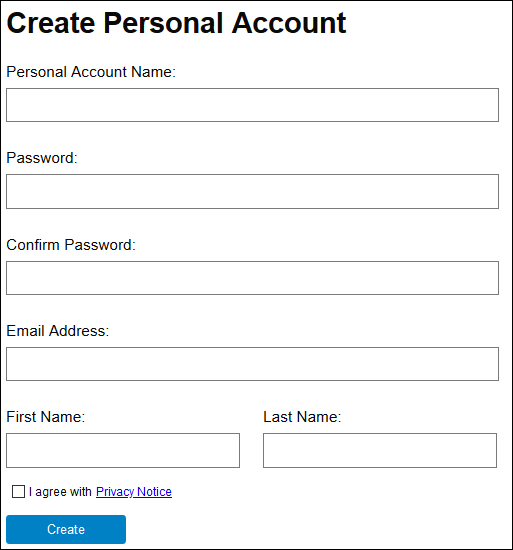
If you have created a personal account in any other Ovid database, you can use that account in Embase. Once you have created your Personal Account and are signed in, then return to the Main Search Page by clicking the Search tab.
- Once you have created your Personal Account and are signed in, then return to the Main Search Page by clicking the Search tab
- Click the Save Search History button beneath the search results
- Name the search
- Select an option from the Type dropdown list: temporary, permanent, AutoAlert, expert searches or My Projects.

- Click on Save
Auto Alerts In Embase
Ovid E-Mail Update Service
Ovid databases may be set up to send regular, free updates of searches to an email address. Updates are sent each time the database is updated, ranging from weekly to monthly.
To set up an AutoAlert search:
- Create your search strategy. Remember to break your search into concepts. After each concept, click on Search.
- Combine terms with OR or AND. Using OR will retrieve records with any of the listed terms (broadens your search). Using AND will deliver records that have all of the terms (narrows your search).

The final line of the search will be the only results that will be emailed. When your search strategy is complete, click "save search history," and log into your personal Ovid account. Use "create a new personal account" if you have not yet set one up.
Name your search (diabetes obesity exercise) and choose "Auto Alert (SDI)"

Below the search name box, you have a menu of autoalert options.

- Scheduling Options: Decide on how often you wish to receive the updates. "On database update" is the most common selection.
- Delivery Options: Leave on "email," unless you'd like the results delivered directly into the "My Projects" section of your personal Ovid account.
- Recipient's Email Address: Your default email address based on your login is provided. If you wish the AutoAlert to go to another email, you can change it here. To send to more than one email address, separate the addresses with a comma (no spaces).
- Email Subject: use a subject line that will be meaningful to you.
- Email Options include having the search embedded in your email message, or as an attachment. You can also choose html or plain text.
- Report Type: decide what format works best for you. "Email includes records only" is the most common choice.

- Fields: Choose whether abstracts, subject headings, etc. should be sent with the citations.
- Result Format: Ovid format is the most readable, and can be imported directly into your preferred citation manager.
- Sort: References may be sorted by author, date, source (journal) or publication type.
When finished click on Save. New citations that meet the search criteria will be emailed each time the database is updated according to the schedule you have determined.
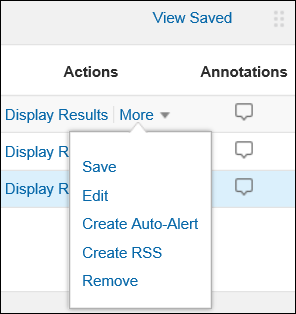
To revise an autoalert, click on "view saved" on the main search page.

Use the editing icons to change the search, view the AutoAlert history, display the details of the search history or create an email jumpstart. You can use the “Copy” button to create a copy of the selected search, then use the editing buttons to modify. You can delete any saved search using the “Delete” button.

Ovid Auto Alert Service Discontinuation Instructions
- Login with your Ovid username and password
- Under My Workspace, click on My Searches & Alerts and then click on AutoAlert (SDI) Searches and locate the alert you want to stop

- If you want to delete the alert entirely, check the box beside it and click the delete button.

- If you want to suspend the alert (stop getting notifications, but still keep the alert strategy saved in case you want it again later) click the pencil icon above the alert title. On the next page, check the "suspend" box and click save. If you want to reinstate it in the future, you can do the same thing and uncheck the suspend box
- Now log out. Your AutoAlert should be discontinued
Embase on Ovid Guides & Tutorials
-
EMBASE Advanced Techniques on Ovid. Ovid WoltersKluwer. (2017 January 4). 14:23 min.
-
Embase: Excerpta Medica Database Guide (Ovid platform).